OK, OK I admit progress has been slow. Traveling, making a living, all conflict with working on the old house. However, things are moving along. Here are some pics from last March. This is the SW corner of the room with the floors insulated and down, and the washer and dryer and well pump installed.
Here is the same corner today. We've begun to enclose the appliances with some great 18th feather edge paneling we found. Too short to use on a wall, its great for this project. The only hold up now is to find pintles that will fit these great turnip ended old hinges. Did I ever show you the wonderful old 18th C windows we put in? Aren't they fine? OK the white paint has to go. I wish you could see all the bubbles in the glass, we've been saving this glass for a long time for something just like this.
Here is the SE corner of the room, with Cy's new TV. We stabilized the wall behind the TV with some left over wood so we could wall mount. This too will be enclosed with the paneling.
Here is the NE corner, still in March, sheet rock and insulation and wiring done, ready for some mud.
This is in April. We hired the foam guys to come in and spray closed cell insulation on the ceiling, so we could be warm and still see our old beams. Here they are covering the beams to protect from the foam.
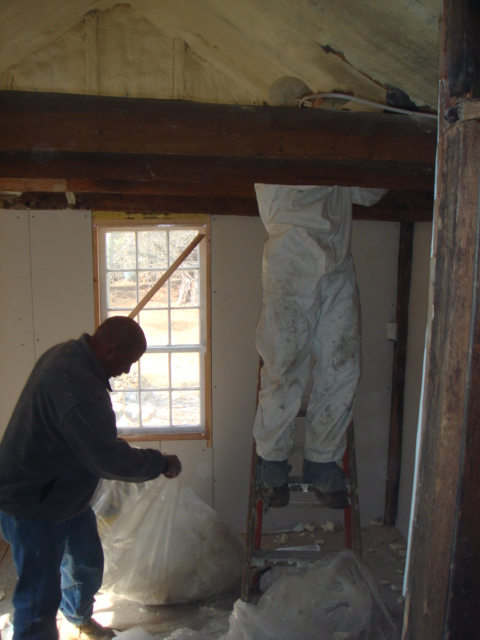
How's this for a great picture? The guy is in process of spraying foam. Man, I'm getting out of here, its really smelly!
Almost done!
Starting the clean up. They are using wire brushes and claw hammers to release the duct tape covering the beams which protected them from the spray.
Looking cozy? Should be a nice warm winter this year.
Fast forward to August. Since the foam must be covered by fire code, we choose to hand plaster it, rather than put up sheetrock. There was really no way to fasten the sheetrock without hiding the beams. So we spent a long painful summer working on our ceiling. Because the foam left hills and valleys, and is not by nature smooth, I used a teeny tiny trowel to put up the plaster, working along with the grain of the foam and going in between the beams. Here you see Cy putting the final touches on the long sanding process, all hand work, no sanding blocks would work here.
And of course what do you have to do after you sand a lot of plaster? Vacuum it up of course. I am now deliriously happy, because the next step is putting up lots of masking tape and buying paint. Yeah!


No comments:
Post a Comment